|
Revell 1/25 Hummer H1 Easy-Kit |
|
|
Kit Number 85-1938 |
|
|
Reviewed By Joe Staudt, #39453 |
|
|
|
|
|
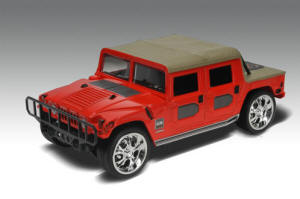
MSRP: $14.95 USD The Hummer has carved out a niche for itself as the king of the American-made SUV’s. With its military pedigree, it can take on any terrain it is thrown into, while coddling its driver with leather seats and a killer sound system. Inevitably, it has also become a target for the customization: taking a vehicle that is already larger-than-life and making it even more so. The subject kit for this review follows that larger-than-life customization premise and presents the Hummer H1 as the ultimate tuner vehicle, with huge, chrome wheels, special graphics, and a sound system powerful enough to blow out the windows on nearby vehicles. This is a natural application for this kit, since this is precisely the sort of over-the-top treatment that appeals to the pre-teen boys (and girls) that these snap-together kits are designed for. So let’s see what this kit has to offer. The kit is molded in orange and black, with clear plastic for the windows and headlights, and a “small” tree of chrome pieces. There is very little flash, and mold lines are almost non-existent. The body is a one-piece representation of the soft-top version of the H1, with the canvas top and bed cover molded on. The engraving is sharp throughout, and has lots of detail. The kit is a curbside, so the doors and hood are molded shut. The orange plastic is REALLY orange, and doesn’t match any of the colors available on an actual H1, but for a customized vehicle the color works. The tub interior is molded in black, with separate seats, dashboard, and steering wheel. The seats have hollow backs, but once the vehicle is put together they’re pretty hard to see if left black. The dashboard instruments are molded well enough that someone with a steadier hand than mine could pick out the details with paint if they were so inclined. The chassis is also molded in black. It is a one-piece affair with engine, exhaust, suspension, and drive train detail molded in. Plastic coil springs for all four wheels are the only pieces to be added. Again, detail is nice and crisp, if a bit on the basic side. The chassis attaches to the body with two screws. Four giant chrome wheels with separate pieces for the brake disks are shod with no-name “rubber-band” tires to get the appropriate tuner look. The wheels attach to steel axles that can be installed in either of two positions: normal or lowered. The sticker sheet contains carbon-fiber inserts for the doors, tailgate, and hood, side sills that are supposed to look like exhaust pipes, a license plate, taillights, an “RM Customs” fender emblem, and a set of massive speakers for the rear deck. I’ve built several of Revell’s Easy-Kits over the past few years, and the stickers keep getting better and better. The ones in this kit are nearly as thin as waterslide decals, but are also strong enough to survive some less-than-gentle handling on the way from the sheet to the model. The instructions are basic but clear, with good line drawings and parts called out by name and number. In order to get this done quickly for the review, and because my modeling time is way too limited these days (small children will do that, you know), I decided to stick to the basics on this one. I brush painted the canvas top and bed cover flat black and left the body orange. I picked out interior and chassis details with silver paint, but left them otherwise bare. I spent most of my time detailing the body with matte black on the grills, hood latches, door handles, and other trim pieces. Taillights, turn signals, and side marker lights got a 3-layer treatment: black for their outer trim, then silver on the lenses to provide a background for the clear red and amber. Since this was supposed to be a custom job, I added some “bling” with silver surrounds on the door handles and a Bare-Metal Foil “Ultra Chrome” grill shell. The “Hummer” insignias on the fenders and front were dry-brushed with silver as well. As a final touch, the chromed disk brakes got a coat of steel paint to differentiate them from the chrome wheels they would go behind. Assembly was quick and easy, requiring maybe forty minutes at the most, including sticker placement. Although it is a snap-together kit, I would recommend adding a dab of glue to most of the parts to prevent them from coming apart later. The coil springs and the roll bars in particular will almost require some glue to stay in place properly. I installed the axles in their upper holes to get a lowered look; the other position just looked way too high for my tastes. The stickers went on easily and fit their assigned locations almost perfectly. The only exceptions were the side sill decals, which are just barely too long to fit the sills properly. I elected not to apply the speaker decals or the taillights, which I had already detailed with paint. As I mentioned before, these stickers are amazingly thin, and I commend Revell for the advances they have made in this area. The final result of this build was a sturdy model with rolling wheels and a coolness factor that is sure to please most kids, as well as the kid in many of us adults. Kit-bashers may be able to take this kit and go a long way with it if they are so inclined. My thanks to Revell and IPMS for the opportunity to review it. |
|
) |
) |
) |
) |
) |
')) |
) |
) |
|
Information, images, and all other items placed electronically on this site are the intellectual property of IPMS/USA ®. |
|