|
Italeri Kit Number 2632 1/48 HS-123A1 |
|
|
Reviewed By Fred A. Amos, #6672 |
|
|
|
|
|
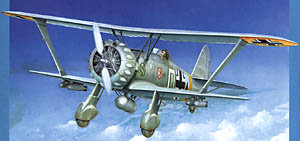
MSRP: $23.00 USD It can honestly be stated that the Hs 123 was the first of the Stukas. The prototype first flew on May 8,1935 by none other than Ernst Udet. It was first used in combat during the Spanish Civil War and later on the Eastern front until there were none left. When I was first offered the opportunity to review this kit my first thought was that it must be a new , modern molding. But as soon as I opened the box I could see the old Esci kit from the late seventies. The kit has several problem areas but after considerable effort I believe it turned into a very presentable model. Construction begins in the cockpit which is of course pretty sparse; a floor, a seat, control column, rear bulkhead, side panels, and instrument panel. This goes together well enough and fits into the fuselage halves without any grief. While the fuselage is drying and ignoring the instructions, my next step was to assemble the upper and lower wings to test the fit. Surprisingly, the fit was pretty good with just minor seam filling and sanding, at the point where the lower wing meets the fuselage. Fitting the stabilizers proved to be a challenge because of the struts underneath. I glued the stabilizers into the slots and placed the struts in place without glue to be sure of the alignment. After the glue dried, I set the struts aside till later. It was necessary to putty the open seams on the stabilizers. Now that the fuselage had dried the next step was to glue the upper gun deck in front of the cockpit and fill in the open seams. At this point you have to consider how you are going to handle assembling the wing to fuselage struts. These struts are very fragile so I chose to glue them to the bottom of the upper wing and then strengthen the joint with super glue. Then I gently spread the struts enough to slip the tongues into the slots in the side of the upper fuselage. I carefully slipped the main struts into place and glued only the bottom joint. This is because these struts are at a severe angle and I wanted to get them lined up correctly. When I was sure of the position and angle I applied a little super glue to the strut joint on the lower wing for more strength . After the struts had dried, I carefully spread the upper struts and removed the upper wing. This made masking and painting easier and safer. Now comes the worst part of this kit, the cowling. The cowling is split front to back so the bulges could be molded. The engine goes together well enough but the instructions were not clear about how to place it into which cowling part, front or rear. There is nothing in either the front or rear cowlings to line up the engine so I messed up and got it about 15 degrees off center. This caused the opening for the machine guns to be out of alignment. I cut the mounting block off, drilled a hole in the middle of the bulkhead and in the middle of the back of the engine, and super glued a hooked brass rod into the bulkhead. Then with a good amount of super glue, I glued the engine to the front of the model. After the two cowling parts had dried I began to file and sand around the bulges. Only three had lined up properly so there was a lot of sanding. It was necessary to use a fair amount of Tamiya putty (my putty of choice) to close up the joint of the landing gear to the wing. And then more sanding. I chose to paint the model in a 1940 scheme RLM 61,(Dark Brown) 62,(Green) 63,(Light Grey) and 65(Light Blue). It took a lot of careful masking but everything came out OK. I wouldn’t recommend this kit for the novice or light hearted modeler but if you want an unusual Luftwaffe aircraft for your collection, this will have to do until somebody comes along with something better. The Italeri kit No 2632, Henschel Hs 123 A1, was provided to the IPMS/USA Reviewer Corps by the Testors Corp. |
|
) |
) |
) |
) |
|
Information, images, and all other items placed electronically on this site are the intellectual property of IPMS/USA ®. |
|