|
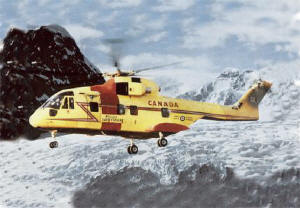
Italeri Kit Number 1226 1/72 EH-101 "Cormorant" |
|
Reviewed By Orlando Reyes, #6399 |
|
|
|
Price: $20.00 Upon opening the box you will find three (3) sets of sprues with a total of 118 pieces. Five of these pieces are extra as they are labeled “parts no for use.” An additional sprue with 20 pieces contains the clear parts. In addition you find a set of decals and an instruction pamphlet. The pamphlet contains a small history of the aircraft on the front panel in seven (7) languages-English, German, Italian, Spanish, French and Japanese. The back cover of the instruction pamphlet also has two (2) color profiles of the aircraft. They describe two (2) aircraft. One for the Canadian Armed Forces, the other as a Demo aircraft. I chose to build the Demo aircraft as I was told this is the model depicted by the kit. These profiles are in black and white. The directions for construction are divided into eleven (11) assemblies and some of these assemblies are in turn subdivided into two or three other subassemblies. All the parts are ID by number. Parts location can be found in the pamphlet as each major assembly is ID by a number. Each subassembly is Id by a Capital letter. The color scheme is ID by white letters inside a black circle. The manufacturer recommends Model Master colors. The kit panel lines are a mixture of recessed and raised. Construction was started with the cockpit assemblies and subassemblies, followed with the interior of the aircraft. The console and details were painted prior to gluing them together. Interior details and the rear seats were added. Interior color was light gray. Windows were installed at this time. The engine assembly was done and installed, but the blade hub was not done at this time. The interior details and engine assembly was glued to one side of the fuselage and fuselage halves were mated. The bottoms of the fuselage sections do not align well, especially at the rear section where the drop door is located. Green putty was added and the area was feathered. The windows were masked and the entire kit was sprayed with international yellow. The pontoons on the side were painted red, as well as the rear wing. At this time I painted part 15A red. I found later that I made a mistake as it should have been left yellow. The rear rotor was painted black and installed. Weight was added to the front of the kit to make it sit on its tricycle landing gear. The engine exhausts were painted steel grey and installed. The interiors of the exhaust were painted black. Exterior detail was installed at this time and the kit decals were added. I found difficult to install some of the outside detail as it was confusing to find some of the locations. The kit does not have any markings for this additional equipment and I felt I put some on the approximated location but I am not 100% satisfied. I never glued the rotor blades as it would have taken a lot of space. So my kit has the rotor but no blades. The kit seats nicely on its tricycle wheels and looks neat. The model can be build by anyone, therefore I will recommend it to the novice, as well as the expert. I would like to thank Italeri for the opportunity to build the kit. Happy Modeling. |
|
Information, images, and all other items placed electronically on this site are the intellectual property of IPMS/USA ®. |