|
ICM Kit Number 72531 1/72 BTR-152V |
|
Reviewed By Jim Pearsall, #2209 |
|
|
|
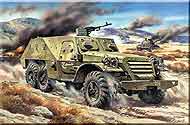
MSRP: $9.98 USD The Vehicle: The BTR-152V was one of the keystones of the late 50s early 60s Soviet doctrines which called for overwhelming attacks by armored columns supported by motorized infantry. The armored thrust has been provided in model form with the T-55 through T-78 series tanks. WhatÆs been missing is the arm which takes and holds those positions struck, decimated, and bypassed by the armor. The BTR-152 is a 6-wheel drive open topped armored truck. There is room inside for about a dozen troops, two drivers, and at least a couple of gunners to handle the installed machine gun. ThereÆs also some cargo space for supplies, troop support equipment, food, etc. So itÆs really a Soviet SUV. Like so many things they claimed, they invented it first!! The Kit |
|
|
|
When I opened this kit, it
looked like it was going to be one of those ōone eveningö jobs. There
are two fairly small trees of small parts, the chassis and the upper
body, and the wheels. 8 of them. There were two sheets of decals.
I pretty much followed the instructions. I painted the wheel hubs, and left the tires in the black plastic. I then painted everything except the machine gun dark olive green. Set the airbrush on ōwideö and let fly. There are details and washes to be painted later, but in my experience (I was an Air Guard VCO for 10 years) all tactical vehicles are painted after theyÆve been assembled. Fast, thorough, and no finesse. |
|
|
|
I assembled the running
gear first. The kit uses plastic axles instead of metal, but theyÆre
solid and just the right length. The spring assemblies are nicely
detailed on the outside. None on the inside. But who looks under
there? You do? OK. I put a silver grey wash on the springs. TheyÆre
still green, but they look like theyÆve got some wear. The differential/axle assemblies were the first point where I ran into some trouble. There was flash at the openings where the axles went through. Because these are pretty thin parts, itÆs hard to determine where the flash ends and the part begins. But I got them cut to length, and the drive shafts all fit in nicely. The differentials and drive shafts had to be sanded to get rid of the connection points and mold lines. The transfer case went in OK, but there was a large mold separation line across it. A few swipes with a file, some sandpaper, repaint, and itÆs fine. Insert the axles and add the wheels, and the underside is complete. At this point I knew this wasnÆt a one evening project. |
|
|
| Now turn the assembly over, and begin the interior. I did a wash of thinner with some dark grey on the boards for the troop seats and the driversÆ seats. I did some detail painting on the dashboard, but there are only 3 large dials and a bunch of what appear to be switches on the dash. Since it sits way down under the overhang of the driverÆs armor, itÆs impossible to see these details anyway. The steering wheel is nicely done, but like the gauges, you can tell theyÆre there, but thatÆs it. There were two HUGE sink marks in the top of the dash. So I filled them. |
|
|
|
Turns out this is covered
by the hood when the body is installed. Wasted effort. Now things began to pick up. Add the rest of the seats, and the gear levers, put some boxes in the cargo area, and put the top on. The body fits very nicely to the frame. ItÆs a friction fit. If you donÆt want to glue it on, itÆll stand up to moderate handling without coming off or displacing. I added some painted detail on hinges and firing ports to both bring them out, and probably they would have received unit level corrosion control, and the paint NEVER matches. Then the fiddly bits. ThereÆs a spare tire, which goes on nicely. The pintle hook in the rear is nicely molded and fits the hole. The front bumper goes on solidly. Then there are the headlights, blackout lights and brush guards which sit on both front fenders. These nearly killed me. No locating marks, spindly little attachment lugsģ ARRRRGH! Super glue on my finger! Blackout light stuck to my finger! OK, stop, deep breath, go watch some TV, let everything set up. ThereÆs nothing I can screw up that I canÆt fix. And I did. Both screw it up and fix it. Next the decals. I did a standard Soviet Army vehicle from the 1960s. No fancy paint job, just that ōspray greenö finish. I put down a layer of Future where the decals went, and applied them after the Future dried. They were what I expect from Russian decals. Fair to poor quality. One of the unit markings cracked when I applied it, and one of the vehicle numbers broke apart on the sheet in the water. This was the sheet with the ōICMö logo on it. The other decal sheet looked to be better quality, but it was for a Syrian(?) vehicle in sand scheme, or one done in a two-tone brown/sand. Also, the instructions included for this sheet, were the box top painting and the color scheme drawing on the back of the box. IÆm not sure if there are markings for other vehicles. I think so. I added the machine gun as the last thing, after I put on the dull coat. It sticks up, and I was sure IÆd break it off while handling. The MG is fairly petite, and had no flash. The color scheme drawing shows a shoulder rest which isnÆt there. AMS sufferers can add their own. |
|
|
|
Overall Assessment If youÆve ever built AirfixÆs M-3 half track from the late 60s / early 70s, youÆve got an idea of the fit and finish for this model. There were nicely molded parts (body and chassis, wheels), and there was flash (differentials) There were places where there was engineering brilliance (the body/chassis fit and the design for the drive shafts, axles and springs). There were places where I felt like I was losing a game of ōstump the dummyö.(The lights and brush guards.) Generally this is an OK kit for small scale. The challenges can be overcome with patience, tweezers and gel super glue. IÆm glad I didnÆt have to figure out how to fix a huge problem with the drive train. |
|
Information, images, and all other items placed electronically on this site are the intellectual property of IPMS/USA «. |
)
)
)
)
)