|
Tamiya Kit Number 89620 1/35 Scale German Pz.Kpfw. III Ausf. L |
|
Reviewed By Chad Richmond, #10346 |
|
|
|
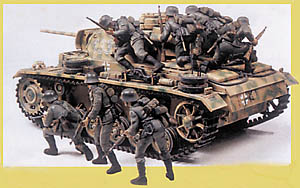
MSRP $48.00 Tamiya has re-released one of their really great armor kits, along with an aluminum barrel and a Panzer Grenadier figure set. The combination is nice, but the figure set is still the original 1975 issue, with no improvements. The aluminum barrel is a nice addition, and the tank commander figure is very nicely done. It is a good example of how Tamiya’s figures have improved since the initial release if their Panzer Grenadier set. The Panzer III kit was issued in 1997, and is of high quality. Markings are included for tanks from the sPzAbt 502 1st Company, Russia, 1942, 10th Panzer Division, Tunisia, 1943, 18th Panzer Division, Russia, Winter 1942 and the 11th Panzer Division, 15th Panzer Regiment, Russia, 1943. The last are the markings I chose. Unlike most kits, armor or aircraft, I chose to build this one per the instruction sheet as a part of the review. The first assembly is the lower hull and running gear. I did leave off the road wheel, return rollers and drive sprockets for painting. Assembly is very easy with no fit problems. This is one of the best fitting armor kits I have built. I also left off the muffler because of painting. Next comes the upper hull, and I did it by the instructions, attaching all of the little widgets, tools, brackets, etc. This is not the recommended way of doing it, which I will touch on later. This was the only place that I had to do any kind of putty work. There are numerous ejector pin marks on the underside of the sponsons, plus the holes used for attaching the external stores that need to be filled after attachment. These are the only detractors in the whole kit, and could be ignored if you’re not worried about some judge dinging you. Lastly, the turret and gun are assembled, and you have three major assemblies that are ready to be put together. |
|
|
| I had to put some sheet plastic shims on the lower hull at the upper front edge on each side where the upper and lower hulls joined, to close up a very minor gap. I opted to use the sheet plastic instead of putty later, because of the ease of doing so. The mating of the upper and lower hulls was great. This is where the attachment of headlights, tail lights, brackets, etc. show that it is best to put them on just prior to painting. Even if you are careful, you’ll bend or break something. |
|
|
|
The scheme I had chosen was one of the box schemes, the
Russia, summer 1943, in yellow and brown. The instruction sheet did not
include this scheme, so the drawings on the side of the box were my only
guide. It was at this point that I discovered that none of the
configurations of the tanks were the same. There were subtle little
differences that were not pointed out on the instruction sheet. You have
to study the drawings or pictures on the box before beginning construction
to prevent errors later. In the case of my chosen scheme, I had to go
back and remove part of the stand off armor on the mantlet. I did not
notice this requirement, however, until I had everything painted decals in
place and wash applied. In removing part C13, the spaced armor plate, I
managed to do substantial damage to the sides of the spaced armor mount
for the mantlet. Luckily, I had another Pzr III Ausf L kit that was
destined to become a Pzr III Ausf N to rob the parts from. When I got
them attached and painted, my dark yellow didn’t match. It was much
lighter. I decided not to worry about it and went on. The road wheels, return rollers, and drive sprockets fit like a champ, and the glueable rubber tracks went on with no problems whatsoever. The building time for this kit is only a few hours, including painting. Due to the ease of construction and the overall quality of the kit, you can truly build it in a weekend and have something you will be proud of. The figures, however, are a different matter. The figure set is definitely showing its age of nearly 30 years. I only assembled two of the figures, and was not impressed. The parts were difficult to clean up due to mold mismatch and lots of flash. When you start to assemble them, you also find that you will have a large gap at every junction. Whenever you put the arms on the figures, use Tenax or Tamiya’s liquid glue, so you can move the arms around to conform to the weapon being carried. You can come close, but that’s about as much success as I had. The rifles seemed to be a little under scale to me, also. I also had difficulty getting everything on the belt, especially the ammo pouches. For the price increase of the kit, I’m not sure that everyone will be anxious to buy it, since you can purchase each of the included items separately at the same, or even lower total price. The Pzr III L kit, # 35215 is still readily available. I would have much rather Tamiya included their Stug III/Pzr III photo etch screen set than the figure set. My thanks to Tamiya America for the review kit, and to John Noack for letting me review it. |
|
|
|
Information, images, and all other items placed electronically on this site are the intellectual property of IPMS/USA ®. |
)
)
)