|
Hasegawa Kit Number HC14 1/24 Lamborghini Jota SVR 'Historic Car' Series |
|
|
Reviewed By Stephen Bierce, #35922 |
|
|
|
|
|
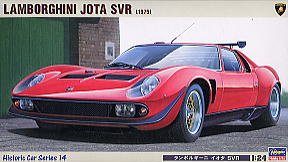
MSRP: $19.99 USD MIURA IMAGE She's a shapely beauty from a quaint Italian town. You're more likely to see her posing on a calendar or in the pages of some glossy-paged fashionable magazine than in person. You imagine her sunbathing on the beach or at the spa, or having a night on the town in the casino district. She's the playgirl's playgirl, chumming with the wealthy and notorious, and prone to be the subject of endless gossip. The gossip than begets legend and myth; the legend then ultimately begets confusion. She's never ever gone out of style--or out of demand. Your mind races whenever you see her. She seems nice enough on the surface, unlike her spoiled-rotten kid sisters. What if you wind up with your hands on her? Do you dare take her home to Momma? She ‘smokes.’ LAMBORGHINI MEANIE MINEY MOE So what is this car? The SVR is the culmination of over ten years of the story of the Lamborghini Miura. It is a one-of-a-kind super car...one that continues to live multiple lives. The Miura, launched in 1966, was the first mid-engined high-performance production sports car--and at the time the fastest production car in the whole World. With a 4.0-liter V-12 engine developed for Formula 1 racers on a chassis created by Giampaolo Dallara (who later made a name in his own right building Formula and Indy cars), this car flirted with 200 mph on the streets. It even looked like it was doing 100 mph standing still, with that sleek Bertone-designed body. But that speed came with a cost in vibration, noise and dicey handling behavior, which prompted Lamborghini to continually tweak the design with successive model upgrades. By 1968, the original Miura has been surpassed by the Miura S, which had an improved chassis and boosted engine power. At that time some of the directors at Lamborghini were interested in the motor sports potential of the Miura S, so New Zealander racecar builder Bob Wallace came to the factory. The result of his effort was the Jota prototype racer--more of a Miura derivative than a simple hot-rod job. While it looked like a Miura and shared the same general shape, the Jota had a unique, redesigned chassis and many other improvements under a body made from aircraft-grade aluminum alloy. The deep-set fixed headlights (as opposed to retractable lights on the production Miura), bloated rear fenders, chin spoiler, and wide-open vents for the brakes hinted at a machine that could conquer the speedways of the globe. The car press fell in love with the Jota. Enthusiasts were watching the calendar, counting the days till it came to Le Mans or Brands Hatch or Watkins Glen. And it never showed. Jota never saw one green flag, let alone a checkered flag. We may never know the real reason the Jota project was given up for lost. We do know that the car itself, after testing finished, was sold off and soon lost in a road accident that proved two things: 1) the car never should have been street-legal, if it ever was; 2) it might have been a deathtrap on the race circuit. Besides, by then the Porsche 917 had arrived--and Jota would have been breakfast, lunch and in-between Ferrari snacks for the 917. However, the love for the Jota endured. After 1971 a number of Miuras were either built as, or rebuilt into, Jota _replicas_, of which this kit represents the ultimate. The SVR followed a few mostly-likeable SVJs, all of which were derived from existing Miura, Miura S, and Miura SV chassis frames. Two SVJs were built for the Shah of Iran and Nicholas Cage of “Adaptation”, “Leaving Las Vegas”, and “Face/Off” fame now owns one of these. The SVR's distinctive difference from the SVJ is its roof-mounted wing spoiler. The one-and-only SVR was built for Heinz Steber of West Germany in 1976, but sometime later a Japanese bought it from him and brought it to Japan, where it is a frequent attraction at car shows even today. This local familiarity has bred dozens of Japanese toys and model kits of the subject--and the Hasegawa kit is at least the fourth or fifth Jota in 1/24th scale to appear on the market. A HIGH-OCTANE THRILLER WITH A FAMILIAR JAPANESE CAST The Hasegawa Jota kit numbers just less than 130 parts, with three sprues shared with Hasegawa's parallel Miura SV kit. The body is a single piece (rather than being divided in a fashion to allow a hinged engine bonnet and trunk bonnet--features seen on other Miura and Jota models) and is molded very thin, especially when compared to models from American companies. Conceptually, this model inhabits a middle ground between the simpler curbside models and the ultra-advanced monster kits I've seen--but already there are companies that'll provide you additional parts (mostly photo-etch) to make this a Magnum Opus project. The molds in general are very crisp and almost no flash at all, with very few noticeable ejector pin marks. The quality of the moldings is very high, probably the highest I've ever encountered in a car kit. (It rivals the Tamiya 1/20th '92 Lotus/Judd Formula One racer that I have!) The mid-engine transverse-block format means a different pattern of assembly from the usual methods seen in most car models. In this kit, the bottom of the engine is integrated with the chassis floor, and the sides and top of the engine can't be assembled into a separate unit and then installed later. The compromises of this model's layout can seem strange at first, but I understand the reasoning for them. AN ITALIAN (INSIDE) JOB The Internet has been extremely helpful in this project: I've found good information from sites such as QV500.com and lambocars.com and from them and others I got a much better understanding of the subject. Since my plan was to change the exterior color (more on that later), it seemed to be a good idea to change the interior colors as well, and for that I needed to know what my options were. I don't believe there is such as thing as an "off-the-rack" Lamborghini. Every car built by Lamborghini is special, custom-made for the buyer. This gives a model builder both freedom and a troubling wealth of choices. What parts of the interior is "leather"? What can be "wood grain"? Metal tone? Carpet? At first, I thought to build my Jota as a competition vehicle, with only a single seat and a roll cage and other GT racer features. After reading the history and other stories on the Web, I modified the plan; the model would still have two seats, but not all the "street" car options. I decided against the "sound system" (so I could use the space between the seats under the rear window for a fire extinguisher) but otherwise would build the interior mostly out-of-the-box. According to Historic GT racing rules I read in a “Grassroots Motorsports” magazine, both seats are called for in some races. With some downloaded photos of real Miuras from the Web as my guide, the central console, dashboard, passenger door backs and seats became "leather", a light blue to contrast with the exterior color. I used basic Testors flat enamel, with Testors Light Ghost Gray flat as an undercoat for some areas. The backsides of the seats were painted in Testors Engine Silver enamel to evoke competition-type units. Parts of the center console still confuse me as to their function. Ashtray? Glove box? Or locker? At least I'm reasonably aware of the gear shifter, parking brake, cigarette lighter and the rocker switches. I'd thought about using the Miura steering wheel instead of the Jota one, but I decided I liked the Jota type better for this car. It is nice to have the choice, though. I dull-coated the floor pan in an attempt to give it a "carpet" look. I toyed with the idea of having "wood grain" paneling between the center console and the floor, but gave it up as overkill. I used Engine Silver frequently on the detail areas of the interior: the rocker switches on the consoles, the hub and spokes of the steering wheel, the switches on the dashboard, the door handles, the gear shifter frame and handle. I prefer Engine Silver to regular Silver enamel because of its lighter tone and sheen...it's closer to Chrome than regular Silver is. After finishing the gear shifter area I noticed that Hasegawa had provided a metal foil piece for the frame--but I think I did okay by just painting. One particular difficulty with the interior was the set of decals for the dashboard gauges. The film on the decals had to be trimmed back on all of them for them to fit their spaces on the part, so I took a draftsman's eraser shield and used it as a template for the trimming process. It wasn't a perfect solution to the problem, and I had to take my hobby knife and cut back the decals more as I placed them on the dash. While they were still wet, I gave each decal a bead of Testors Clear Parts Cement & Window Maker, which I smoothed out with a flat toothpick. This gave the gauges a glassy look that works well. Assembly of the interior was very easy in comparison to the colors and decals. I left the dashboard unit unglued to the cockpit tub as I knew it was likely for me to go back and add more details later. THEY MADE IT LOOK LIKE AN ACCIDENT Q: Did they really demolish a Lamborghini Miura in the opening sequence of the original “The Italian Job”? A: They suckered you! The Lamborghini factory gave the movie company a crash-test mule that Lamborghini already used, and that was what the earthmover dumped off the side of the road. The Miura that was driven in the scene wasn't hurt at all. By the way, the Aston Martin convertible and one of the Jaguars also "trashed" in the film were both restored afterwards and exist today! SIXTEEN CYLINDERS THERE ON THE WALL The engine and rear suspension went together much easier than I expected. I had to shave off some flashing from parts B6 and B7 (the engine blocks ends) around the pins on the bottom so they'd fit their places on the chassis frame (B9). The rear axle simply dropped and locked into place without me needing any glue. The engine rear (B2) needed some test fittings; I used the engine top and the cockpit tub assembly to check its angle before gluing it on to the chassis frame. I don't think I bothered with glue when I added the rear brake/poly-cap assemblies to the chassis or on the rear shock springs. The wishbone units were a little tricky to add, but once they were in place it only took a little glue on top of the brake units and they were fine. The tail piping was a breeze. I was worried about it after horrible experiences with American car models. I wanted to use the Miura air filter parts on the engine top, but Hasegawa didn't provide me the carburetors to work with those, so I used the Jota intake stacks anyway. I decided against using the decals for the cylinder heads after the problems I went through with the dashboard decals. As for painting the parts, I stayed as close as I could to the kit instructions: Engine Silver for the engine block and heads, and the brakes; Semi-gloss Red for the shock-absorber springs; Rust for the exhaust piping (as I didn't have "Burnt Metal" handy). Much of this area of the model went totally unpainted. SUSPENSION OF DISBELIEF If the engine and rear suspension was a pleasant surprise, the front suspension was doubly so. Aside from needing to ream out one of the holes to mount the brake units to the chassis and a little balancing act to set the front shock springs, the assembly was near idiot-proof. The front wheels can be posed. All the parts fit together very well, and I only needed a little superglue to secure the tie rods and the upper parts to the frame. Again, paint was limited to the brakes and the shock springs. Now I know "play value" isn't something that you'd think about when it comes to a $30 model kit, but the thing about posing the wheels is the fact that they tend to kilter sideways when you try to "roll" the car. I'm thinking that it would be a good idea to have a poly-cap/trough or sandwich arrangement around the "steering rack", to hold it snug. That way the wheels can still be posed easily, but can also be set straight and hold that position as well. Since the mechanics of the steering rack are hidden under the fuel tank anyway, it wouldn't be a tough thing to engineer and there wouldn't be any lost "realism". Just my thoughts, anyway. This kit uses the often-seen poly-cap method of attaching the wheels, so the wheels turn. I left the separate knockoff spinners off of the chrome wheels as I was hoping to have a competition look and perhaps I'll put lug nuts at the hubs later. I didn't do any painting on the wheels either...though I may go back and paint the insides later. I don't think I'm confident enough to paint them at my level of skill without risking a mistake or two. The rubber tires are very well molded and fit the wheels snugly. They don't have any raised lettering on the sidewalls. BLUE J When I told my mother about this project (before I received the kit to review) the first words out of her mouth were "Does it come in blue?" Well, the actual car (and thus, what the instructions for the kit call for) is Italian Red with a Black interior. But I'm flexible. I got myself some discount-store brand Royal Blue rattle-can paint for the exterior. With a separate copy of the instruction sheets plan forms as a worksheet, I plotted out the new paint scheme and figured out which parts needed to be painted in the body color and which could be alternate colors. I decided the chin spoiler and the rocker panels would be painted Dark Blue, as a further contrast to the colors I was already using. Another departure from the kit plan--I would omit the wing spoiler from the roof. My reason for this change was the fact that under Historic GT Racing rules, such a spoiler would be considered illegal. Two light coats of the rattle-can Blue (one with the hood and fender scoops separate from the body, then the next with them installed), then a coat of clear semi-gloss, then detail painting (including the fringes of the underside, and Engine Silver framing of the windows and windshield), and finally a unifying dose of gloss-coat. After that, I added the bulkheads for the rear of the body behind the engine. SAFETY FIRST One last piece of the interior to cover: the seat belts. I didn't care for the decals Hasegawa provided...sure they might be fine for a car made in the basic color scheme--but for my scheme they just looked tacky. After experimenting with embroidery floss (which looked too rope-like) I decided on something I just had lying around--paper from a manila envelope! Using an erasing shield as a template, I cut strips of the manila paper in the width I needed and then gave both sides of the strips a belt of base from Testors Sea Blue enamel paint (only base liquid, no pigment). I didn't bother with replicating the buckles, as I didn't have the resources (no photo-etch stuff in my stash). Besides, I may add a driver figure someday. I installed the belts with ordinary white glue and had weights hold them down as the glue dried so the belts would drape in a manner that looked plausible. ONE-TRACK IMAGINATION Q: If the Jota never saw a racetrack in real-life, then why are there models and toys of Jotas with race numbers and sponsor stickers? What's going on here? A: There is a popular Japanese comic book called "Circuit Wolf", it is to super cars what "Initial D" is to street racing. One of the characters in this utterly fictional story drives a Jota; his name is Eiji Sekine. Officially licensed toys and models of his car are readily available, as well as other cars in the series. "Circuit Wolf" probably won't make it over to America--one of the other drivers has a Porsche Turbo decked out in Nazi swastikas! SHINY SIDE UP, RUBBER SIDE DOWN I had a suspicion that the body was going to fit very snugly over the chassis, and I was right. It took some careful stretching of the sides and rear of the body shell to get it all the way around and to clear the ends of the exhaust piping in the back. Before the installation, I painted in the headliner (same Light Blue as the dashboard), fitted the overhead console and interior glass and rear view mirror to the ceiling. Unfortunately for me, I couldn't prevent the windshield pillars from bowing somewhat. It hardly notices. I put the chrome exhaust pipe ends on with white glue, just in case I needed to remove the body again to put more goodies inside later. The scoops in front of the rear fenders went together well and only needed a little tacking with superglue. The chin spoiler's shape confused me as to which side was up and which side was down. I test fitted it both ways and found the proper attitude. I used the Jota type external rear view mirror arrangement although there are also parts for the Miura version too (but no instructions for that). One problem I had was with the passenger door "hardware"--a dinky pair of parts to represent the pushbuttons that are supposed to fit in sockets on either side. These were too small for me to work with...I lost one and decided to fake a solution by cutting a number slate off the chrome sprue and making pieces from it to cover the sockets. My aim was to make it look like the flap-type door handles seen on Corvettes of that era. The locator holes for the door pulls were partly filled in and painted to look like keyholes. It won't pass inspection, but I think it looks about as plausible as anything I could invent. The front grille was made as per instructions with the exception that I edged the part in Dark Blue paint to match the rest of the underside. The windshield wiper was installed unpainted. I painted the backsides of the tail lamp lenses solid Red rather than using translucent paint. The headlamp lenses had a locator tab/slot arrangement I didn't see till I began having trouble putting the pieces together. This isn't shown very clearly in the instructions. Instead of using the clear parts for the marker lights on the front fenders, I used the Testors Window Maker to fill in the holes. The clear lenses for over the headlamp ports fit nicely. Hasegawa gives the builder a choice of European-style or Japanese/American-style license plates. I haven't decided which one I'll install yet; as the parts fit rather loosely on the back of the body. Once I've made up my mind, it'll need to be glued in and that's that! All that's left for me is to find some sponsor decals and my model will be ready for the road course of my imaginations. This kit is the best-engineered scale model that I have ever come across. If all of Hasegawa's car models are like this one to build, I might have to hunt down more of these and start a "racing club". Even before I finished it, it was attracting admirers at the local IPMS meeting. Jota might be an expensive date, but she's classy, she's nice to have around, and her surprises are almost all good ones. Thanks to IPMS/USA, John Noack, Hasegawa, and Fred's Corporation for this project. |
|
|
|
|
) |
) |
|
Information, images, and all other items placed electronically on this site are the intellectual property of IPMS/USA ®. |
|
)