|
Dragon 1/72 Sd.Kfz 165 Hummel Early Version |
|
|
Kit Number 7244 |
|
|
Reviewed By Chad Richmond, #10346 |
|
|
|
|
|
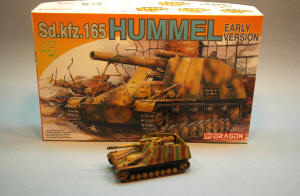
MSRP: $11.95 USD Right from first glance, this looks like it’s going to be a really nice kit and a lot of fun to build. There are seven sprues of parts, the road wheels and hubs are individually molded and packaged separately, and there’s a very nice photo-etch sheet, as well as pre-bent wire brackets for spare road wheels. There’s over 170 total parts for this small model, and a bunch of them are tiny! The decal sheet includes markings for five different vehicles. Four of them are Eastern Front, and one is from Normandy. The one piece chassis, thank God, is plastic, not cast metal. It does have the two screw holes, which are easily filled. The detail is very nicely done and is very petite. The fit throughout the kit is generally good. I did have some space which had to be filled at the junction of the front plate and the turret base. A small piece of 5 thousandths sheet did nicely. The driver’s window hatch does not fit well at all. It is a little small for the opening. The kit instruction sheet is very “busy”, with exploded views and completed views and a multitude of arrows showing where parts should fit. It’s hard to figure out where some of the arrows actually go. Some of the drawings are a little misleading, or are not exactly correct, which caused a few parts to be relocated. The instruction sheet also shows locator slots for the braces for the side armor and the ammo storage bin. These locator slots do not exist, which requires some trial and error fitting to get everything in the right place. The braces, especially, have to be right because of stiffeners on the side plates. The fit of the rear wall of the fighting compartment is also questionable. I wanted to build the model with the howitzer barrel in the travel lock, but I never could get things to fit right or look even close to any pictures or drawings that I had of the Hummel. I ended up putting them in a folded position. Another thing that is interesting in the kit is there are a couple of instances where parts have the same number, but they are molded differently. Part D10, the mounting bracket for the barrel lock arms is a good example. One D10 had the locating pin in the middle; the other D10 has it toward one edge. That is due to the offset of the brackets. It is difficult to see this looking at the instruction sheet, unless you look at the painting guide. There it is very evident. Two of the items provided on the photo etch sheet are the engine compartment intake louvers. They are very petite, very fragile and very thin. Knowing I would be courting disaster, I left them off and opted to use the molded plastic insert, which does look really nice and fits great. When assembling the gun fighting compartment assembly to the lower hull assembly, I never could get all the gaps closed and I couldn’t get the rear of the fighting compartment to fit how I thought it should. There was a slight “step” at the joint. The howitzer is very “fiddly”, but when completed is quite impressive in this scale. Luckily my parts-grabbing carpet coughed up all of my accidental offerings. The only thing that was strange was the gun tube itself. It is molded in three parts. The breech and barrel up to the step down are molded in two halves, top to bottom. The fit is okay, with a little bit of Super Glue needed to even up a couple of gaps. The rest of the gun tube, however, is molded in one piece. It is oval instead of round, and the bore is molded off center. A little time and some superglue took care of that. However, when I glued the two assemblies, I realized that the rear of the gun tube had a slant to it. I used Tamiya’s liquid glue to assemble the two assemblies, rotating the gun tube until the softened plastic had filled in the gap. It eventually ended up looking okay, with very little actual work. The whole gun assembly, once you get everything glued together, is difficult to handle without breaking or bending something, which I did quite often. Getting it into place is tricky, but just about the time you think you are going to break something, it falls in to place and looks fantastic. The gun shield attached to the gun fits perfectly, and looks very realistic if the gun is traversed. The gun elevates and depresses quite nicely, too. The road wheels are great. They are molded separately from the hubs, so you can paint everything separately, and glue the later, with perfect demarcations. The back side of the road wheels is another issue. Since the back side is easily seen, they must also be painted in the hull color. There is a raised ridge on each wheel, but it is very faint, and surprisingly, not the same on every wheel. Thank goodness for my Royal Models metal paint template! Prior to installing the sprockets and wheels, I painted the entire vehicle with a Tamiya dark yellow mix, which is just about 50/50 Desert Yellow and Dark Yellow. I used Tamiya’s Red Brown straight from the bottle and a lightened Tamiya Dark Green. Tamiya’s Gloss Clear was used as the base coat for the decals, which went on very nicely with Micro Scale’s decal setting solutions. I used the markings for a Hummel of the 5th Panzer Division on the Russian Front. The decals, however, did not conform to the recessed panel line, even with Solvaset, so I had to slice them before they would lie down. I did all of my washes and dry brushing the next afternoon and then mounted the spare road wheels and aiming stakes. The axles for the road wheels a very short, so you need to let the glue dry over night, or use Super Glue, because the wheels are easy to get out of alignment. Though the pre-shaped wire brackets are very nice looking, the diameter is just a little small, so I ended up having to remove the brackets, glue on the wheels, and then glue the brackets back in place. The one piece tracks are soft and rubbery, and a little thick at the join point. Because of the softness, it is impossible to thin them any, so I used Super Glue to join then and then glued them to the drive sprockets at the 12 O’clock position. That seemed like the best place to hide the joint. The rear idler has a hex mount, so you can determine the tautness of the tracks. I guessed just right, because once I had the tracks stretched over the return rollers and the track guides properly aligned, the tracks were perfect! I will definitely build another one, just so I can try to figure out how to do the travel lock where it comes out correct. The vehicle looks a lot better with the gun in the travel lock position.Thanks to Dragon USA for the review model and to John Noack for letting me review it. |
|
) |
) |
|
|
|
|
Information, images, and all other items placed electronically on this site are the intellectual property of IPMS/USA ®. |
|
)