|
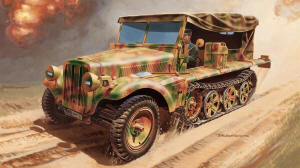
Italeri 1/35 Sd.Kfz. 10 Demag D7 |
|
|
Kit Number 6443 |
|
|
Reviewed By Frank Kranick, #20352 |
|
|
|
|
|
MSRP: $31.00 USD Italeri has had some connotation to a previous Italian model producer, ESCI. Now, both companies have produced versions of the Demag D7 and comparisons can be made. ESCI is long gone and Italeri’s release of this kit is welcome indeed. This is their third sub-type of this small halftrack, the basis for the 250 series that served throughout WWII. It should be reiterated this is a completely new kit from the ESCI release though some similarities exist in basic layout. While ESCI’s kit was ok, Italeri’s is far more refined. Italeri’s first two releases of the Demag were armed with different cannon; this kit is of the more standardized, canvas-topped personnel carrier/ordnance tractor. These always intrigued me, reminding me more of a 1920’s gangster “getaway” car with its long, jaunty convertible top (or tilt) than of its much larger cousins, the Famo or even the Sd.Kfz.11 eight-ton halftrack. Over 17,000 of these vehicles were built by Demag and other firms during WWII and were used in all theaters. Their main use was for towing the smaller howitzers, anti-aircraft and anti-tank guns, Nebelwerfers or various trailers of the Wehrmacht, so diorama ideas abound for this kit. |
|
) |
) |
) |
|
|
Dispersed over four sprues (three tan, one clear), the parts are flash-free and cleanly molded. There are parting lines but nothing that cannot easily removed – it’s just that there are rather a good amount of them. I also had to clean up many ejection pin depressions on visible parts. For these, I used superglue and accelerator, followed-up with a quick sanding. Upon opening the box and inspecting the parts, I found several were off the sprues and one, an optional jerrican rack, was broken. “Link-and-length” track is included and is welcome, as the drape of the track on the road wheels was distinctive for the type. These tracks went on very nicely, without unsightly gaps or inconsistencies in spacing. The road wheels possess petite detail in their distinctive ‘starfish’ ribbing on the spokes and lend themselves to the wash and dry-brush technique. There are no figures included. Starting out (by jumping ahead!), the attachment of the radiator in step 5 will depend on how well you dry-fit and tested the dashboard in step 1. A lot depends on sequencing and if there’s much misalignment in steps 2 and 4, particularly with the engine compartment side walls (30,31), the hood and then the radiator will not fit correctly. My solution to this was to tape together the hood-halves (beneath the hinge line) and glue one side to the sidewall and let it set overnight. The next day, I glued the other side and let it dry securely. I removed the tape and by ‘stitch gluing’ and solid clamping, corrected the resulting misalignment in the hood-halves. Working from the back to the front of the hood, along the center hinge, I slowly corrected the gap. Still, the dashboard was too low, resulting in an obvious gap under the windshield which was filled with strip styrene. The hood itself also left a gap along the firewall so I added a strip of styrene here as well, shaping it at the same time as the other piece under the windshield. You can see my work in the picture of the unpainted, assembled model. |
|
) |
) |
|
|
|
|
I really liked the engineering in Step 6, the road wheels and track
assembly. Here, the left and right tracks are assembled onto the lower
hull walls and the two assemblies are then attached to the hull tub.
This greatly improves construction and allows the builder to deal with
the track parts without the tighter confines in an assembled hull.
Common to most German tracked vehicles of WWII, the interleaved road
wheels are best pre-painted before assembly. The torsion bars for the
road wheels are molded to the lower hull sides (44A, 45A) so no
repositioning of the suspension is possible out of the box. On the subject of the track assemblies, it’s worth mentioning the drive wheels on a prior release were bemoaned for being too large in diameter. Having those releases (Pak 38 (kit #6383) and Flak 38 (kit #371)) in hand, the drive wheels seem to have been corrected with the Pak 38 version. The wheels on the Flak 38 (20mm AA gun, armored cab) are considerably larger and plainly wrong. Kudos for Italeri for saving me the need for Friulmodel tracks and drive wheels in redesigning their molds. The three-point connection of the front axle assembly could offer some leeway for getting a ‘sprung’ look from the front wheels. Just be sure of the orientation of the axle and spring as it can be mounted backwards. Also, you can attach the front axle assembly after the tracks are mounted as this would assist in keeping the front wheels firmly on the ground. I didn’t and the passenger-side tire rides just high enough to rock the model – maybe 1/64th of an inch. The front ‘doors’ can be posed up or down in the vertical slides though some ejector marks will need attention on the door exteriors (parts 20A, 23A). One item of note here – the rear doors have a similar setup as the front doors. However, these doors are taller and if you choose to model them in the down position, they’ll be too tall and will stand proud of the hull tub. This is wrong as a quick Google search turned up photos of Demag D7s which show the doors slide down completely, like their counterparts up front. You’ll have to cut them down if you want to model them in the down position. Look at the photos of my model and you’ll see what I mean… Also, I found one error in a part callout: Step 11 in the assembly of the passenger side fender. The three side supports should include two 77D parts and one 78D. There is good detail in the driver’s area with dashboard instrumentation and the transmission, which is located between the front seats. You’ll need to check references on the transmission levers as the instructions are vague and the main lever looks too tall to my eye. There is a hint of the engine bottom molded into the hull tub but nothing under the hood. These vehicles were equipped with a clamshell hood and interesting diorama possibilities exist if the engine compartment were furnished. I chose to replace the windshield ‘glass’ with some spare clear butyrate as the kit parts – while fitting well and reasonably clear – distorted the view and were a bit wavy in finish. The pioneer tools are nicely rendered but their mounting points are incorrect. The items on the passenger side fender used raised supports which held the tools level and Italeri would have you mount these at convenient spots and angles; they really need to be raised to fit correctly. I had trouble getting the shovel to sit convincingly on the driver’s side fender – this too, needs a raised support. These supports would be very easy to make from strip stock. I chose to not mount the tools as I found evidence of vehicles being so equipped. The two optional jerrican are first-rate. A nice addition is on the rear – a barbed wire holder. These were sometimes fitted for easier storage and deployment of the wire. However, the only way one would know this is a barbed wire holder is to consult references as there is no parts callout in the instructions, only exploded views for assembly. I’d also be careful on installing it per the instructions as it seems to be missing a couple prongs that hold the coiled barbed wire. They would be easy enough to fabricate some from straight pins, nonetheless. Also, there’s no barbed wire to store – just the holder. Markings are provided via water slide decals for four vehicles. There is a three-color camouflage scheme for the Italian campaign, and all-grey SS unit of 1940 France, an overall sand yellow vehicle from 1944 Rome and a Russian Front scheme with white squiggle camouflage over grey. I chose the France-based version in overall grey. I airbrushed some Model Master Panzergrau enamel over the entire model after pre-shading any recesses, louvers, etc. with Flat Black. I followed this with oil washes and dry brushing with more oils of Titanium White, Paynes Grey and Raw Umber mixes of various tones. I then added light dustings of MIG ‘Europe Dust’ pigment to the tracks and front wheels. I experimented with the tilt as injected plastic “canvas” is almost universally lacking in drape and texture. I took some liberties and sanded the lower edges of the tilt to create some droop to the fabric edges due to the supporting framework. I then scratched the topside with 100-grit sandpaper in long strokes to emulate the coarseness of canvas. This gave some texture to the plastic, enough to hint of fabric. The subsequent washes added to the illusion and I’m happy with this treatment of the kit parts. For the seating areas, I hand painted a mix of brown oils paints to simulate leather. For the decals, I used Future as a setting solution as it affected the least amount of area and I dulled the resulting shiny areas with some Floquil Flat Finish from their railroad line; the resulting finish is dead flat and thin with no evidence of my spot touch-ups. I spent perhaps 25 hours on this build, a little more than I’d care to - where I added time was in the washing and dry brushing but I did save time on assembling the entire kit then painting. There are some websites that illustrate the process and I’ve come to rely on this method. I used to dutifully paint road wheels individually and assemble them, driving my build time up. Since I’ve learned to better control my airbrushes, the need to paint so many subassemblies separately has diminished – though I wish I had pre-painted the road wheels as I previously suggested. I chose not to and, while I got a good amount of paint in there, some areas couldn’t be reached and show up under close scrutiny. I also cheated in that I didn’t attach the front wheels until the end… I can recommend this kit to modelers who’ve got a couple armor or soft-skin kits under their belts, mostly for the issue of the hood/engine areas being involved for a good fit. Otherwise, the kit went together well with basic modeling tools, materials and techniques. It is a welcome addition to my stable of FAMO and Krauss-Maffei halftracks and captures the look and style of this vehicle. Many thanks to Italeri, Testors and John Noack for the review sample. This model kit is recommended. |
|
) |
|
) |
) |
|
|
) |
|
Information, images, and all other items placed electronically on this site are the intellectual property of IPMS/USA ®. |
|
)
)