|
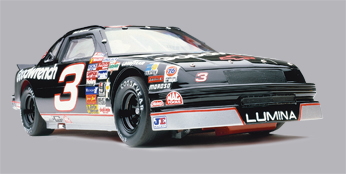
Revell 1/24 #3 Goodwrench Dale Earnhardt Chevy Lumina |
|
|
Kit Number 2876 |
|
|
Reviewed By Walt Fink, #2447 |
|
|
|
|
|
MSRP: $16.75 USD Anyone even mildly interested in sports is familiar with the name Earnhardt; whether known as The Intimidator or just the "black #3 Chevy", Junior's late dad was a legend in motor sports. Revell's kit of Dale Earnhardt's Lumina is a re-issue and consists of 97 pieces, all molded in black (would you expect anything else from a Dale Earnhardt car?). I'd never before built a NASCAR subject so lots of this was new territory for me. Before building the kit, I noted several areas to be addressed in construction... the black plastic presented a small problem right off the bat since I use acrylic paints and as the interior cage is red, I'd have to prime all the interior parts with white first. All the sprues were in one poly bag, and several parts---especially the clear ones---were marred from rubbing together, so had to be polished out. There are several inconsistencies in the instruction sheet, box art, and what's actually on the sprues. Despite what the instructions seem to indicate, there's no chrome tree in the kit. Several pieces are noted as "chrome", but in the long run there isn't that much chrome on the car, so for those few pieces which needed to actually BE chrome (hood pins, valve covers, air cleaner, etc.) I used Alclad Chrome. The engine assembly follows standard practices, with a two-piece crankcase, separate heads, oil pan, and accessories. The distributor and plug wires are supplied as a one-piece molding. When built up, the engine is a nice representation of the real thing. (Photos 1, 2, 3, and 4) A fair amount of work was needed on the interior cage parts, as they all exhibited prominent mold lines and a little flash in some areas. After cleaning up all these parts, they were first primed with white, and then painted Gunze Sangyo acrylic H3 red. (Photo 5) After they'd dried, I painted the roll padding and window safety webbing with flat black enamel. (Photo 6) Assembly of the cage was a little interesting, as both sides were slightly warped and didn't quite fit the floor pan. I glued up the parts where they fit and left the questionable joints until later. The seat has prominent and hard-to-get-at ejector pin marks, but if the window webbing's left in place they'd be hard to see anyway. Though the instruction sheet specifies aluminum for the instrument panel, the box art shows it black with aluminum bezels for the gauges...I liked the appearance of the box art rendition better so painted mine similarly. A mix of flat, semi-gloss, and gloss black paint on various parts of the interior gave the model some presence and cut down on the monotony of only two colors. All those bars and cage parts fit together into a fairly complex maze; for strength, I used gap-filling CA to assemble the interior parts and touched up the joints afterward. The two engine mounts are fairly small points of attachment and weren't sturdy enough to align the drive train, so I waited until I had installed the "Arm Assembly" from the next instructional step before permanently cementing the engine in place. When all was about done, I noticed there was a mismatch at the front of the cage frames; though I lined things up as best I could, the radiator was skewed slightly because of the misalignment. As this'll be largely unseen when the body shell's attached, I didn't worry about it too much. The radiator hoses have to be tweaked a bit to get them to fit. By the way, the instructions call the coolant pump fitted to the differential as part number 29, but it's actually part number 20...the fan's number 29. Final fitting of the oiler tank, exhaust, and other components completed the cage and chassis. (Photos 7, 8, and 9) Turning to the body shell, I sanded down the few mold lines, polished out the "box rash" blemishes, then gave it an overall spray of Testors gloss black enamel. The shell's only real problem was that it was slightly warped from front to back, having a pronounced twist to it which I wasn't able to correct. The decals were great and snuggled down to conform to the shell with no problem...until I came to the ones for the rear bumper/fascia. After wrestling with these two, I'm not real sure they were made for this body shell. Both the instructions' decal placement guide and the photo of the finished model on the box show the lower rear quarter panels to be much more shallow than the model's---the photo of the real car on the box top matches the kit. After lots of slicing, dicing, setting solution, and trying to coerce these two decals to assume angles and contours they definitely weren't agreeable to, I finally gave up, figuring I'd reached the limit of what was possible with the decal. After some touch-up to the decals, I over-coated everything with Gunze Sangyo H30 Gloss to protect them. The wheels have good detail, and the tires have a mounting boss in them so the inner and outer wheels can only be mounted one way. The one thing which came to mind when looking at these and the body shell was "black, black, and more black" so I deviated from the OOB build just slightly by using Shabo dry transfers to apply the Goodyear Eagle logos to the tires. To further break up the black monotony, I highlighted the lug nuts with dark gray and painted the wheel hubs aluminum per the box photo. (Photo 10). Oddly enough, the final assembly steps in the instructions show this lettering on the tires but it's not included in the kit. (Actually, one of the drawings is reversed so the tire reads "Raeydoog Elgae". That's OK. I know what they meant.) The six separate hood pins are TINY little pieces, let me tell you. I resorted to sticking these to a piece of tape before trying any clean-up, hoping to prevent having one or more fly off the bench and being devoured by the rug monster. I used the Alclad Chrome treatment on these and attached them to the body with white glue (working over a box lid so as to contain any dropped ones.) Assembling all the big chunks, I found things slightly off---again. The left rear tire protruded from the well too far so I resorted to breaking the rear axle loose and re-positioning it to center it beneath the body shell. The car doesn't sit true---due, I assume, to the twist in the body shell plus the mismatch in the cage, or maybe---just maybe---to the fact that hey, I'm no car builder. From a safe distance, the model looks pretty good. It's no contest winner, but I'm still learning. An experienced auto modeler will no doubt be able to overcome the small problems I encountered. Thanks to Revell and IPMS/USA for the opportunity to review this kit, and special appreciation to Bob Schott for his assistance and NASCAR knowledge during the project. |
|
) Photo 1: Engine block |
) Photo 2: Assembled engine |
) Photo 3: Assembled engine |
) Photo 4: Assembled engine |
) Photo 5: Cage parts |
) Photo 6: Cage padding painted flat black |
|
Photo 7: Assembled cage |
) Photo 8: Assembled cage |
) Photo 9: Chassis/suspension |
) Photo 10: OOB wheel on left, finished wheel on right |
) Photo 11: Finished model |
) Photo 12: Finished model |
|
Information, images, and all other items placed electronically on this site are the intellectual property of IPMS/USA ®. |
|
)